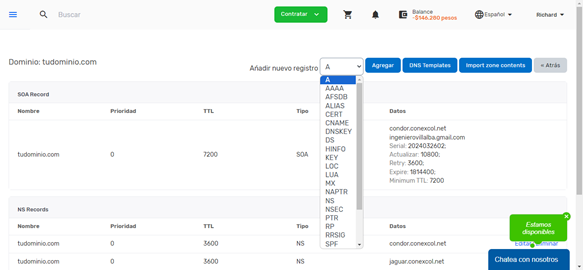
Hoy aprenderemos el paso a paso para poder agregar Registros DNS desde tu portal de clientes Conexcol, para comenzar ingresa con tus credenciales al portal de clientes:
https://portal.conexcol.net.co/clientarea/
Primero debes apuntar el dominio a los siguientes DNS para que toda la configuración que vas a realizar adelante tome efecto sobre la ZonaDNS:
condor.conexcol.net
jaguar.conexcol.net
Luego vas a dar clic en el apartado de "AdminDNS" y después en "ZonaDNS" si esa opción no te aparece, puedes solicitarla en el chat de Conexcol o enviando la solicitud para activarla a soporte@conexcol.net.co.

Estando ya en la ZonaDNS vas a dar clic sobre "Añadir Dominio"

y luego das clic en "Continuar" para después dar clic sobre el dominio que acabas de agregar para continuar agregando los registros que necesitas, ya sean CNAME, TXT, AAAA, MX, etc...

Como ejemplo vamos a agregar un registro CNAME.

Damos clic en continuar y ya el registro CNAME estaría guardado solo quedaría esperar a que propague de 10 a 30 minutos
